struct stat and missing field initializer

If you are using following code

#include <sys/stat.h>
struct stat foo = {0};

in the modern c++, and compiler warnings (GCC: -Wall -Wextra) it is likely that you
will find following warning

<source>:4:21: warning: missing initializer for member 'stat::st_ino' [-Wmissing-field-initializers]
4 | struct stat foo = {0};
 | ^

It is due to new syntax introduced in C++11 for uniform initialization. It means that
{0} is doing initlization of just first data member of struct stat. To fix this warning
you have to use struct stat foo {};

GCC Dual ABI

GCC 5.1 introduced a new implementation of libstdc++ to meet C++11 requirements for std::string (copy-on-write) and std::list (std::list::size() is O(n)).

Mixing of different versions ABI will likely to cause a crash.

Macro _GLIBCXX_USE_CXX11_ABI can be used to select an appropriate implementation of libstdc++.

-D_GLIBCXX_USE_CXX11_ABI=1 will pick new ABI (libstdc++11).

-D_GLIBCXX_USE_CXX11_ABI=0 will pick old ABI (libstdc++).

New ABI has been set to default since GCC 6.1

Issue gcc -v to find out whether compiler is using new ABI or not.

gcc -v
Using built-in specs.
COLLECT_GCC=gcc
COLLECT_LTO_WRAPPER=/usr/lib/gcc/x86_64-linux-gnu/9/lto-wrapper
OFFLOAD_TARGET_NAMES=nvptx-none:hsa
OFFLOAD_TARGET_DEFAULT=1
Target: x86_64-linux-gnu
Configured with: ../src/configure -v --with-pkgversion='Ubuntu 9.4.0-1ubuntu1~20.04.1' --with-bugurl=file:///usr/share/doc/gcc-9/README.Bugs --enable-languages=c,ada,c++,go,brig,d,fortran,objc,obj-c++,gm2 --prefix=/usr --with-gcc-major-version-only --program-suffix=-9 --program-prefix=x86_64-linux-gnu- --enable-shared --enable-linker-build-id --libexecdir=/usr/lib --without-included-gettext --enable-threads=posix --libdir=/usr/lib --enable-nls --enable-clocale=gnu --enable-libstdcxx-debug --enable-libstdcxx-time=yes --with-default-libstdcxx-abi=new --enable-gnu-unique-object --disable-vtable-verify --enable-plugin --enable-default-pie --with-system-zlib --with-target-system-zlib=auto --enable-objc-gc=auto --enable-multiarch --disable-werror --with-arch-32=i686 --with-abi=m64 --with-multilib-list=m32,m64,mx32 --enable-multilib --with-tune=generic --enable-offload-targets=nvptx-none=/build/gcc-9-Av3uEd/gcc-9-9.4.0/debian/tmp-nvptx/usr,hsa --without-cuda-driver --enable-checking=release --build=x86_64-linux-gnu --host=x86_64-linux-gnu --target=x86_64-linux-gnu
Thread model: posix
gcc version 9.4.0 (Ubuntu 9.4.0-1ubuntu1~20.04.1)

https://gcc.gnu.org/onlinedocs/libstdc++/manual/using_dual_abi.html

Git and word documents

If you got word documents in the git repo and tired of seeing binary diff message from git, do the following setups to fix it.

$ git diff
diff --git a/hello.docx b/hello.docx
index bc73959bc592..122761966158 100644
Binary files a/hello.docx and b/hello.docx differ

To see diff of what has been changed in the word document, do following:

  • Install docx2txt. You can download it from http://docx2txt.sourceforge.net. Follow the instructions in the INSTALL file to put it somewhere your shell can find it.
  • Create or append file ~/.config/git/attributes to have

*.docx diff=word

  • Edit .gitconfig to have following commands

[diff "word"]
textconv = ~/git_docx2txt.sh

[alias]
wdiff = diff --word-diff=color --unified=1

  • Create ~/git_docx2txt.sh with following text

!/bin/bash

docx2txt.pl "$1" -

  • chmod a+x ~/git_docx2txt.sh
  • You will have

$ git diff
diff --git a/hello.docx b/hello.docx
index bc73959bc592..122761966158 100644
--- a/hello.docx
+++ b/hello.docx
@@ -1 +1 @@
-Hello world
+Hello world: View word diff in git.

$ git wdiff hello.docx
diff --git a/hello.docx b/hello.docx
index bc73959bc592..122761966158 100644
--- a/hello.docx
+++ b/hello.docx
@@ -1 +1 @@
Hello worldworld: View word diff in git.

Happy diff view.

Setting up cppcheck

To install pre-built cppcheck: http://cppcheck.sourceforge.net/

sudo apt-get update
sudo apt-get install cppcheck

In case, you want to use latest cppcheck, download and build it from the source code

wget https://github.com/danmar/cppcheck/archive/2.1.tar.gz
tar zxvf 2.1.tar.gz
cd cppcheck-2.1
mkdir build
cd build
cmake ..

P.S: In case you are interested for cppcheck GUI use cmake -DBUILD_GUI=ON ..

make
sudo make install

Once installation is complete.

which cppcheck
/usr/local/bin/cppcheck

cppcheck --version
Cppcheck 2.1

Build your cpp project with cmake and pass on an extra parameter -DCMAKE_EXPORT_COMPILE_COMMANDS=TRUE to cmake. It will produce  compile_commands.json file in your build folder for the project.

Execute cppcheck -p </path/to/folder/having/compile_command.json>.

To use it in VSCode add following to the tasks.json

{
    "label": "Run cppCheck",
    "command": "/usr/local/bin/cppcheck",
    "args": [
       "--project=${workspaceRoot}/build/compile_commands.json"
    ],
    "problemMatcher": "$gcc",
}

Ref: https://gist.github.com/aakbar5/268a2072138345893b7f82590dcc3d26

Create .desktop file

Create .desktop to have an app launcher for Ubuntu

Make sure that .desktop file is copied to /usr/share/applications/

[Desktop Entry]
Type=Application
Name=EclipseC++
GenericName=Eclipse
Comment=Eclipse for development
Exec=/path/to/eclipse
Icon=/path/to/icon.xpm
Terminal=false
MimeType=text/plain;
Categories=Development;IDE
StartupNotify=true
# If you won't specify following line you may end having duplicate icons
# in Ubuntu Dock bar where first is the one you have added to Dock and the
# other one is showing the running application. To avoid this issue you need
# to add following line in .desktop file
StartupWMClass=Eclipse
# How to determine value of StartWMClass for any application:
# – Run your application
# – Run xprop WM_CLASS from the commandline
# – Your mouse cursor will be in different shape
# – Click the window bar of the your application
# – Note down the value(s) printed on the console where you executed xprop
# – These printed values will be WM_CLASS(STRING) = "ABC", "RST", "XYZ"
# – Use any of the string shown in "xxx" for StartupWMClass in .desktop file. For example
# you can use ABC or RST or XYZ.
view raw .desktop hosted with ❤ by GitHub
[Desktop Entry]
Version=1.0
Type=Application
Terminal=false
Exec=/path/to/executable
Name=Hell world
Icon=/path/to/icon


Ubuntu got some tools which can be very handy:

To validate:

sudo desktop-file-validate /usr/share/applications/sample.desktop


To install:
sudo desktop-file-install /usr/share/applications/sample.desktop


In case if my your newly installed sample.desktop is not working properly use sudo tail -f -n 5 /var/log/syslog to see error.

Linux kernel & VS Code

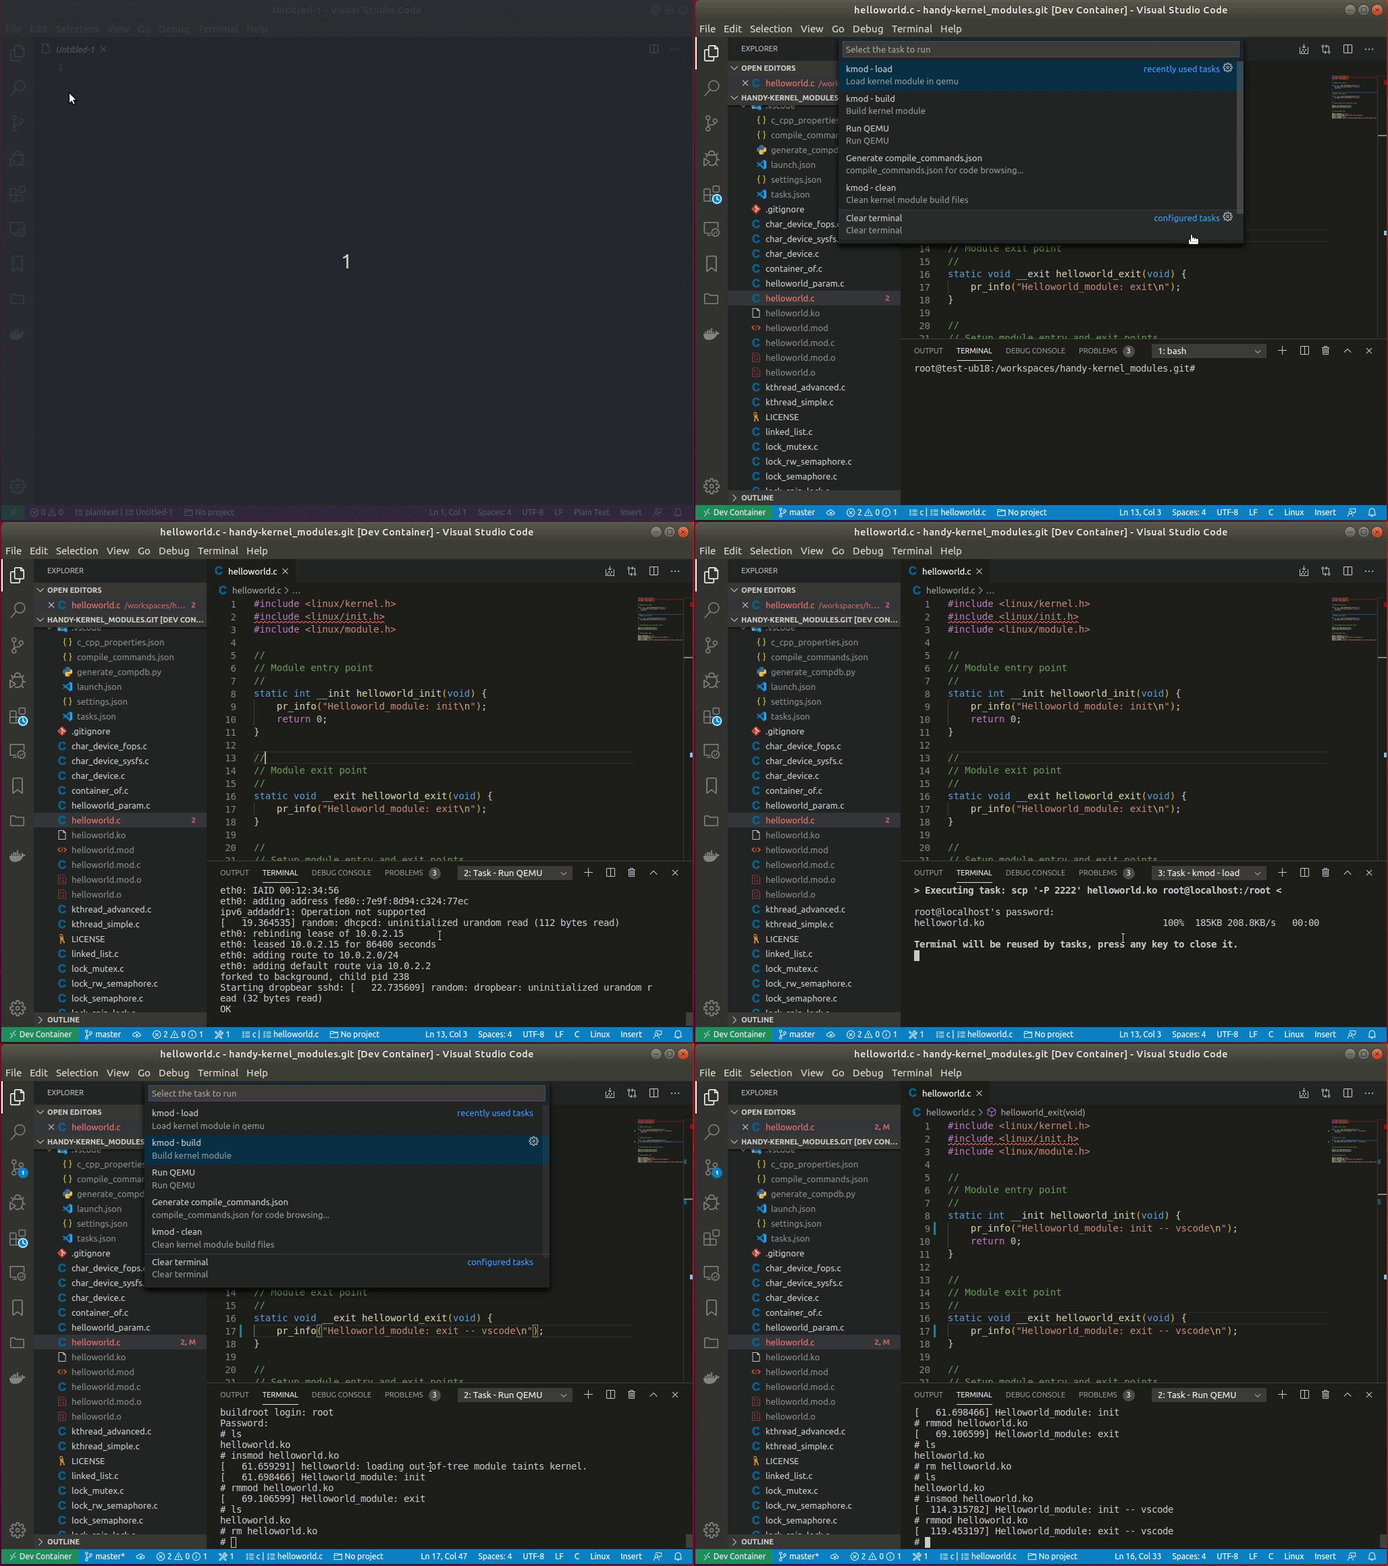
If you are using VSCode for Linux kernel development, following setup will be useful:

  1. Clone https://github.com/aakbar5/handy-kernel_modules. It contains the
    • Makefile: to build kernel modules
    • .devcontainer: to setup vscode for remote development inside the Docker container
    • .vscode: From tasks build and run Qemu.
  2. Start vscode
  3. Open the folder having linux kernel development project
  4. Select: Remote-Containers: Open Folder in Container… from the popup menu.
  5. Select the folder selected in #2
  6. Keep an eye on the vscode status bar while it is showing Opening Remote…
  7. Once vscode is setup, your project will be ready for development in container environment.
  8. Press CTRL+P for Tasks: Run Task
  9. Select kmod – build task to build a kernel module setup in Makefile.
  10. Press CTRL+P for Tasks: Run Task
  11. Select Generate compile_commands.json from the list of tasks.
  12. Press CTRL+P for Tasks: Run Task
  13. Select Run QEMU and wait for QEMU to be ready for use
  14. Press CTRL+P for Tasks: Run Task and select kmod – load

    • This command will copy built kernel module to QEMU.
  15. Get back to QEMU shell in vscode terminal and use kernel module commands to test your new kernel module.
  16. Once you are done with development, use Dev Container: Close Remote Connection option.

kernel_in_vscode

dup2 usage


// A simple example of how dup2 can be used
const char* msg = "Text written by standard file descriptor\n";
int fd = open("dup2_test.txt", O_RDWR | O_CREAT | O_TRUNC, S_IRUSR | S_IWUSR);
write(fd, msg, strlen(msg));
/* Map stdout to our file */
dup2(fd, STDOUT_FILENO);
printf("Text written by dup @ stdout file descriptor\n");
close(fd);

view raw

dup2_usage.c

hosted with ❤ by GitHub

Setting up include-what-you-need (IWYU)

Use following instructions to install IWYU (https://include-what-you-use.org/) on Ubuntu 18.04.3 LTS:

sudo apt-get update
sudo apt-get install -y build-essential cmake git zlib1g-dev libncurses5-dev llvm-6.0-dev libclang-6.0-dev libclang-6.0-dev clang-6.0
git clone https://github.com/include-what-you-use/include-what-you-use.git iwyu.git
cd iwyu.git
git checkout clang_6.0
mkdir -p build
cd build
cmake -DIWYU_LLVM_ROOT_PATH=/usr/lib/llvm-6.0 ..
make 
make install

Once installation is complete, you will find `include-what-you-need`

# include-what-you-use --version
include-what-you-use 0.10 (git:a1878c4) based on clang version 6.0.0-1ubuntu2 (tags/RELEASE_600/final)

To execute include-what-you-need:

Build your cpp project with cmake and pass on an extra parameter -DCMAKE_EXPORT_COMPILE_COMMANDS=TRUE to cmake. It will produce  `compile_commands.json` file in your build folder for the project.

Execute iwyu_tool.py -p </path/to/folder/having/compile_command.json>. It may take time depending upon the code size.

fix_includes  can be used to apply recommended changes.

To use it in VSCode add following to the tasks.json

{
    "label": "Run iwyu",
    "command": "iwyu_tool.py",
    "args": [
        "-p",
        "${workspaceRoot}/build"
    ],
    "presentation": {
        "echo": true,
        "reveal": "always",
        "focus": true,
        "panel": "shared",
        "showReuseMessage": true,
        "clear": false
    },
    "problemMatcher": "$gcc"
}

Ref: https://gist.github.com/aakbar5/268a2072138345893b7f82590dcc3d26

symlinks in virtualbox

If you are using Windows in Virtualbox ontop of Linux based (i.e: Ubuntu) machine, you might have seen this problem that accessing symlinks in windows does not work. Instead of showing contents after resolving Linux symlinks, you will end up with “Protocol error”.

This error can be fixed using vBoxManage by setting a boolean property (SharedFoldersEnableSymlinksCreate) against each folder shared with VirtualBox based machine.

VBoxManage setextradata <VirtualMachineName> VBoxInternal2/SharedFoldersEnableSymlinksCreate/<SharedFolderName> 1

After executing above command, verify your change with following:

VBoxManage getextradata <VirtualMachineName> enumerate